
Motivation #
I don’t post very often because I’m not a fan of publishing very short blog posts. The kind of content I aim for usually takes a fair bit of effort, and sometimes I simply don’t have the bandwidth to write it. At the same time, I often come across small, interesting things that are worth sharing - just not enough to justify a full-length post.
This is exactly where social media shines: microblogging. Sharing a few sentences, an image, or a short video is often enough to get the gist of a message across in an easily digestible way to anyone who’s interested.
Still, relying on social media has its downsides. Even with “save for later” features, posts tend to get lost, making them hard to find or reference later. Your content is often locked into one - or more - social media platforms, and those platforms can come and go.
To avoid these downsides and encourage myself to share more often, I decided to add yet another feature to my blog: microposts.
Challenges with my setup #
As I mentioned in my first blog post I’m using Hugo for my blog. Hugo is a static site generator (SSG), which means all content is written as files - typically Markdown - and the site is built and published from those sources.
This works well most of the time, but it isn’t ideal when I want to share something quickly, especially on the go. If I wanted to post while travelling, the process would look something like this:
- Log in to GitLab, where my blog’s content is stored
- Navigate to the correct repository
- Find the right folder and create a new file
- Add the content including the required metadata in the right format (you will see an example later)
- Commit the changes
Once that’s done, a new micropost is published in under a minute.
Even so, navigating GitLab from my phone, filling out the metadata, and getting everything into the right format is still too many steps - and not something I’d want to do.
UI #
Before diving into the technical side of things, let’s start with how this looks from a user’s perspective.
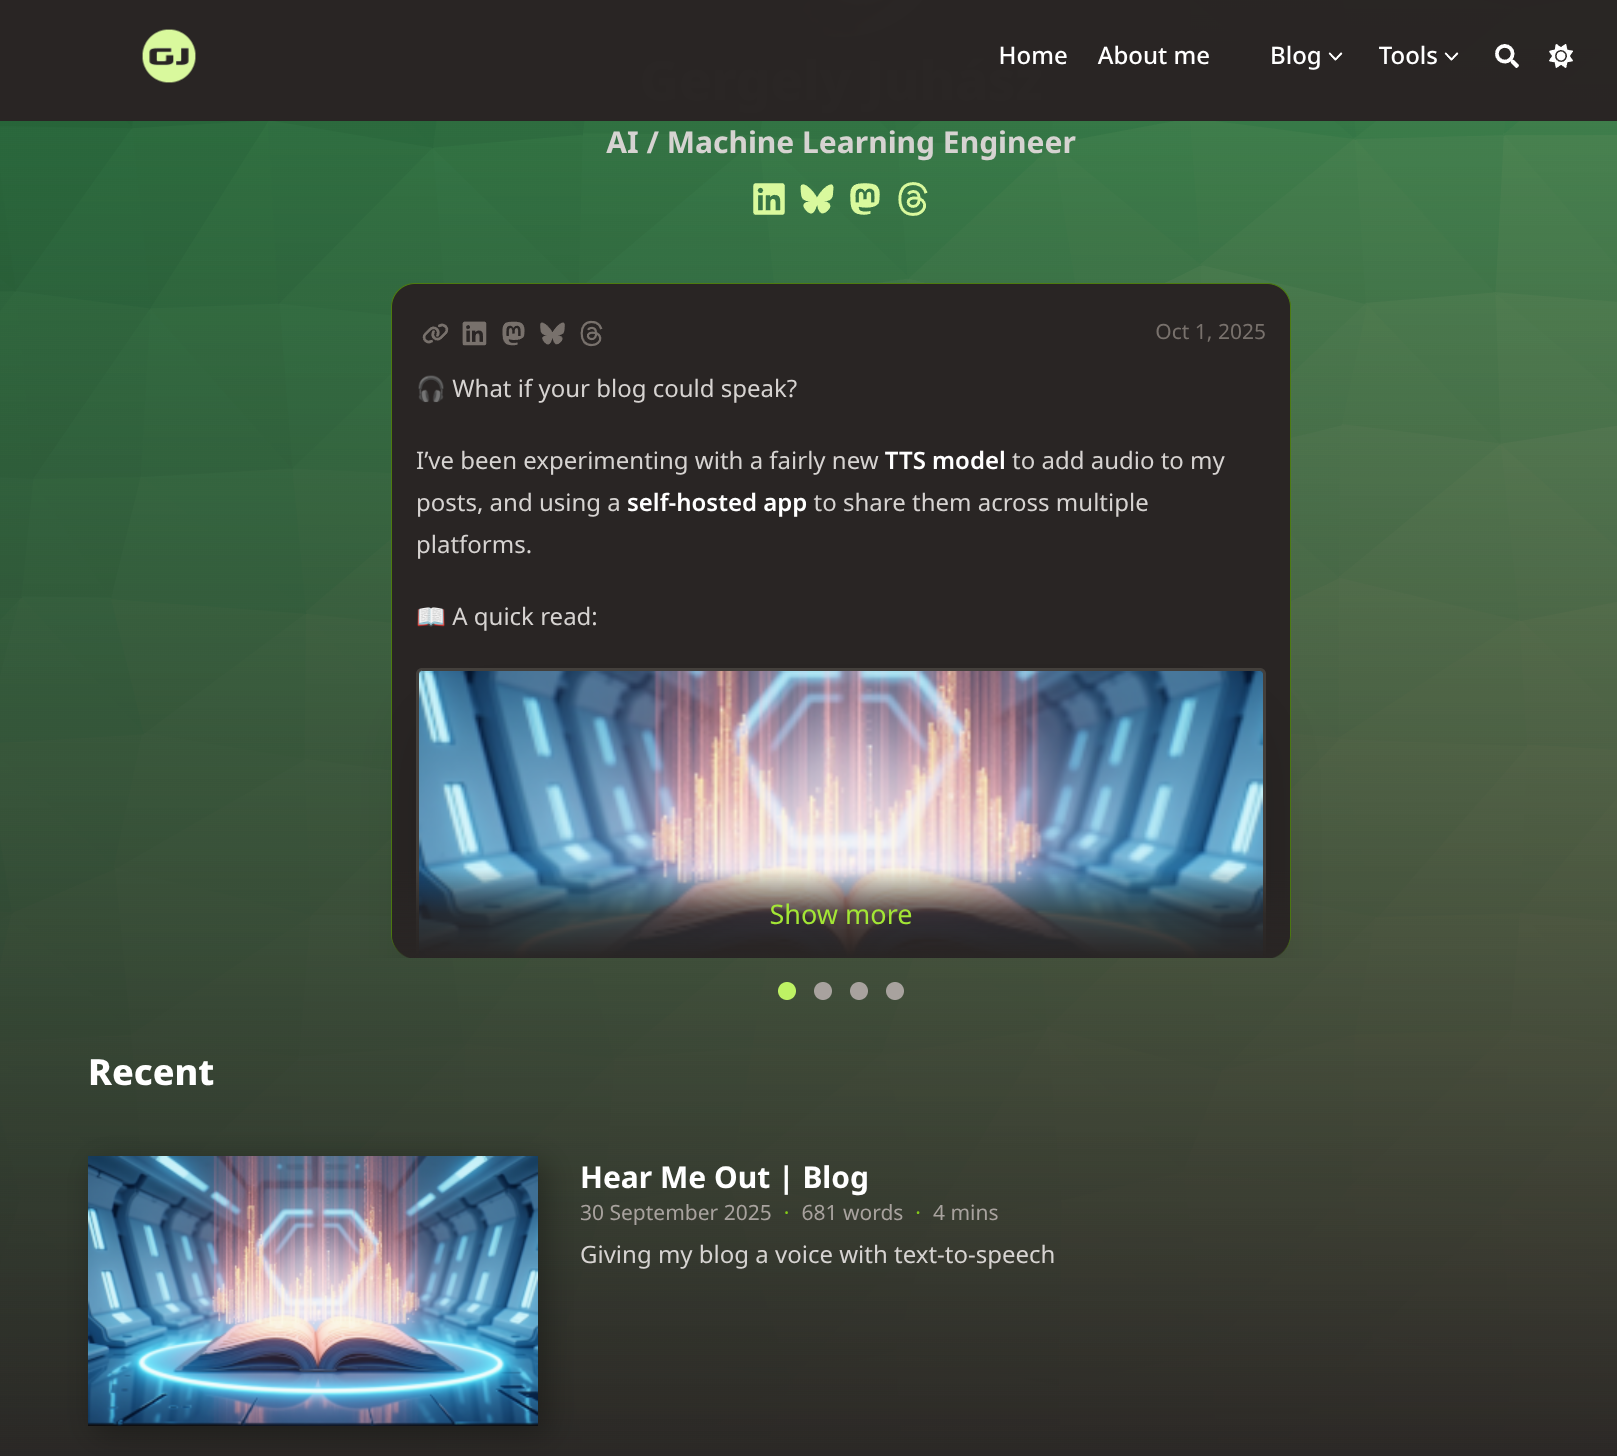
On the home page, microposts have their own section above the recent blog posts. This way, people can quickly skim through shorter updates first, and save the longer reads for later.
Currently, the three most recent microposts are displayed at a time. You can move between them using the dots at the bottom or by swiping on a phone or tablet. The last dot takes you to a “See all” card, which links to the dedicated list page.
For the design, I took inspiration from Instagram’s Threads recommendations - I liked how it makes it easy to flick through short posts quickly, so I borrowed that idea for my blog.
Microposts can vary quite a bit in length, which can look a bit awkward. To keep things neat, each card has a maximum height. When content exceeds that limit, it’s truncated and a “Show more” link appears.
At the top of each micropost card, there’s a row of icons on the left. The first icon links directly to the post on my blog, which is useful both for sharing and for search engines. The remaining icons link to the same post on supported social media platforms, in case someone wants to leave a comment or reaction there.
In the top-right corner, you can see the date when the micropost was published.
Below the header, the full text of the micropost is displayed. If the content includes a link to another post on my blog, it’s automatically replaced with a preview card - which I’ve found looks much cleaner than showing a raw URL.
High level plan #
Publishing these short posts only on my blog wouldn’t be very useful on its own - hardly anyone would see them. In my previous blog post, I mentioned that one of the reasons I’m active on multiple social media platforms is that I started using the self-hosted version of Postiz to post to multiple platforms from a single place.
One unexpected benefit of this setup is that I now have a reliable way to access all my posts. Most social media platforms make it surprisingly tricky to get your own content, often forcing you to rely on data archive exports or scraping.
At a high level, the steps I wanted to automate looked like this:
        flowchart TD
            START@{ shape: circle, label: "Start" }
            ISTHERENEWCONTENT@{shape: decision, label: "New content in Postiz?"}
            BLOGREPO@{shape: process, label: "Pull blog changes from GitLab"}
            ADDNEWCONTENT@{shape: process, label: "Create a Markdown file for each new social media post"}
            ADDTOGIT@{shape: process, label: "Git add+commit+push"}

            END@{ shape: circle, label: "End" }

            START --> ISTHERENEWCONTENT
            ISTHERENEWCONTENT-- No --> END
            ISTHERENEWCONTENT-- Yes --> BLOGREPO --> ADDNEWCONTENT
            ADDNEWCONTENT --> ADDTOGIT --> END
This could easily be handled with a simple Bash or Python script and a cron job. But a few months ago, I came across n8n and decided to give it a try.
If you haven’t heard of it before, n8n is a low-code / no-code workflow automation tool. It lets you build automations by connecting small, configurable steps together, rather than writing everything from scratch. Each of these steps - called nodes - handles a specific task, like running a command, calling an API, or sending a notification.
I love writing code and I’m usually a bit sceptical of low-code/no-code tools because of the trade-offs involved. That said, there’s been a lot of hype around n8n, so I figured this was a good opportunity to see whether it could actually help solve this problem - and maybe even change my mind.
Solution overview #
        architecture-beta
            group internal(clogos:home)[Home]
            group external(cloud)[External]

            service postiz(clogos:postiz)[Postiz] in internal
            service n8n(clogos:n8n)[n8n] in internal

            service gotify(clogos:gotify)[Gotify] in internal

            service gitlab(logos:gitlab-icon)[GitLab] in external
            service cloudflarepages(logos:cloudflare-icon)[Cloudflare Pages] in external

            postiz:R --> L:n8n
            n8n:R --> L:gotify
            n8n:B --> T:gitlab

            gitlab:L --> R:cloudflarepages
The setup involves five systems. The first three are self-hosted, while the last two are external services I’ve used since the beginning of my blog:
- Postiz – where I create and publish my social media posts
- n8n – checks for new posts in Postiz, processes them, and generates Markdown files for my blog
- Gotify – sends me a notification when n8n has finished running
- GitLab – stores all my blog content, configurations, and source code
- Cloudflare Pages – automatically builds and hosts the blog whenever GitLab changes
Here’s how it works in practice: Postiz is the source of my content. n8n periodically checks for new posts, processes anything it hasn’t seen before, and commits the resulting Markdown files to GitLab. Cloudflare Pages then picks up the changes and rebuilds the site. Meanwhile, Gotify notifies me once the n8n workflow has finished, so I know everything has been processed successfully.
It sounds more complicated than it is. Each system has a small, well-defined role, which also makes debugging much easier when things inevitably go wrong.
Postiz #
Postiz is a social media management tool that lets you plan, write, schedule, and post to multiple platforms from one place. They support a long list of platforms - some I hadn’t even heard of before. The paid version offers AI-powered features like image generation and text suggestions, but I’m using the self-hosted version at no extra cost, which works perfectly for my setup.
Initial setup #
The first step was connecting all the social media accounts I wanted to use. Postiz has great step-by-step documentation with up-to-date screenshots, which made the setup surprisingly painless.
- Bluesky and Mastodon were the easiest to connect.
- Threads was quick too, though my account got temporarily suspended on the first day - their review process cleared it within 48 hours.
- LinkedIn was the slowest, because it requires setting up an organisation and submitting a form for approval.
Overall, connecting everything took me roughly an hour, but I was also checking a few details along the way. Someone more focused could probably do it faster.
Scheduling posts #
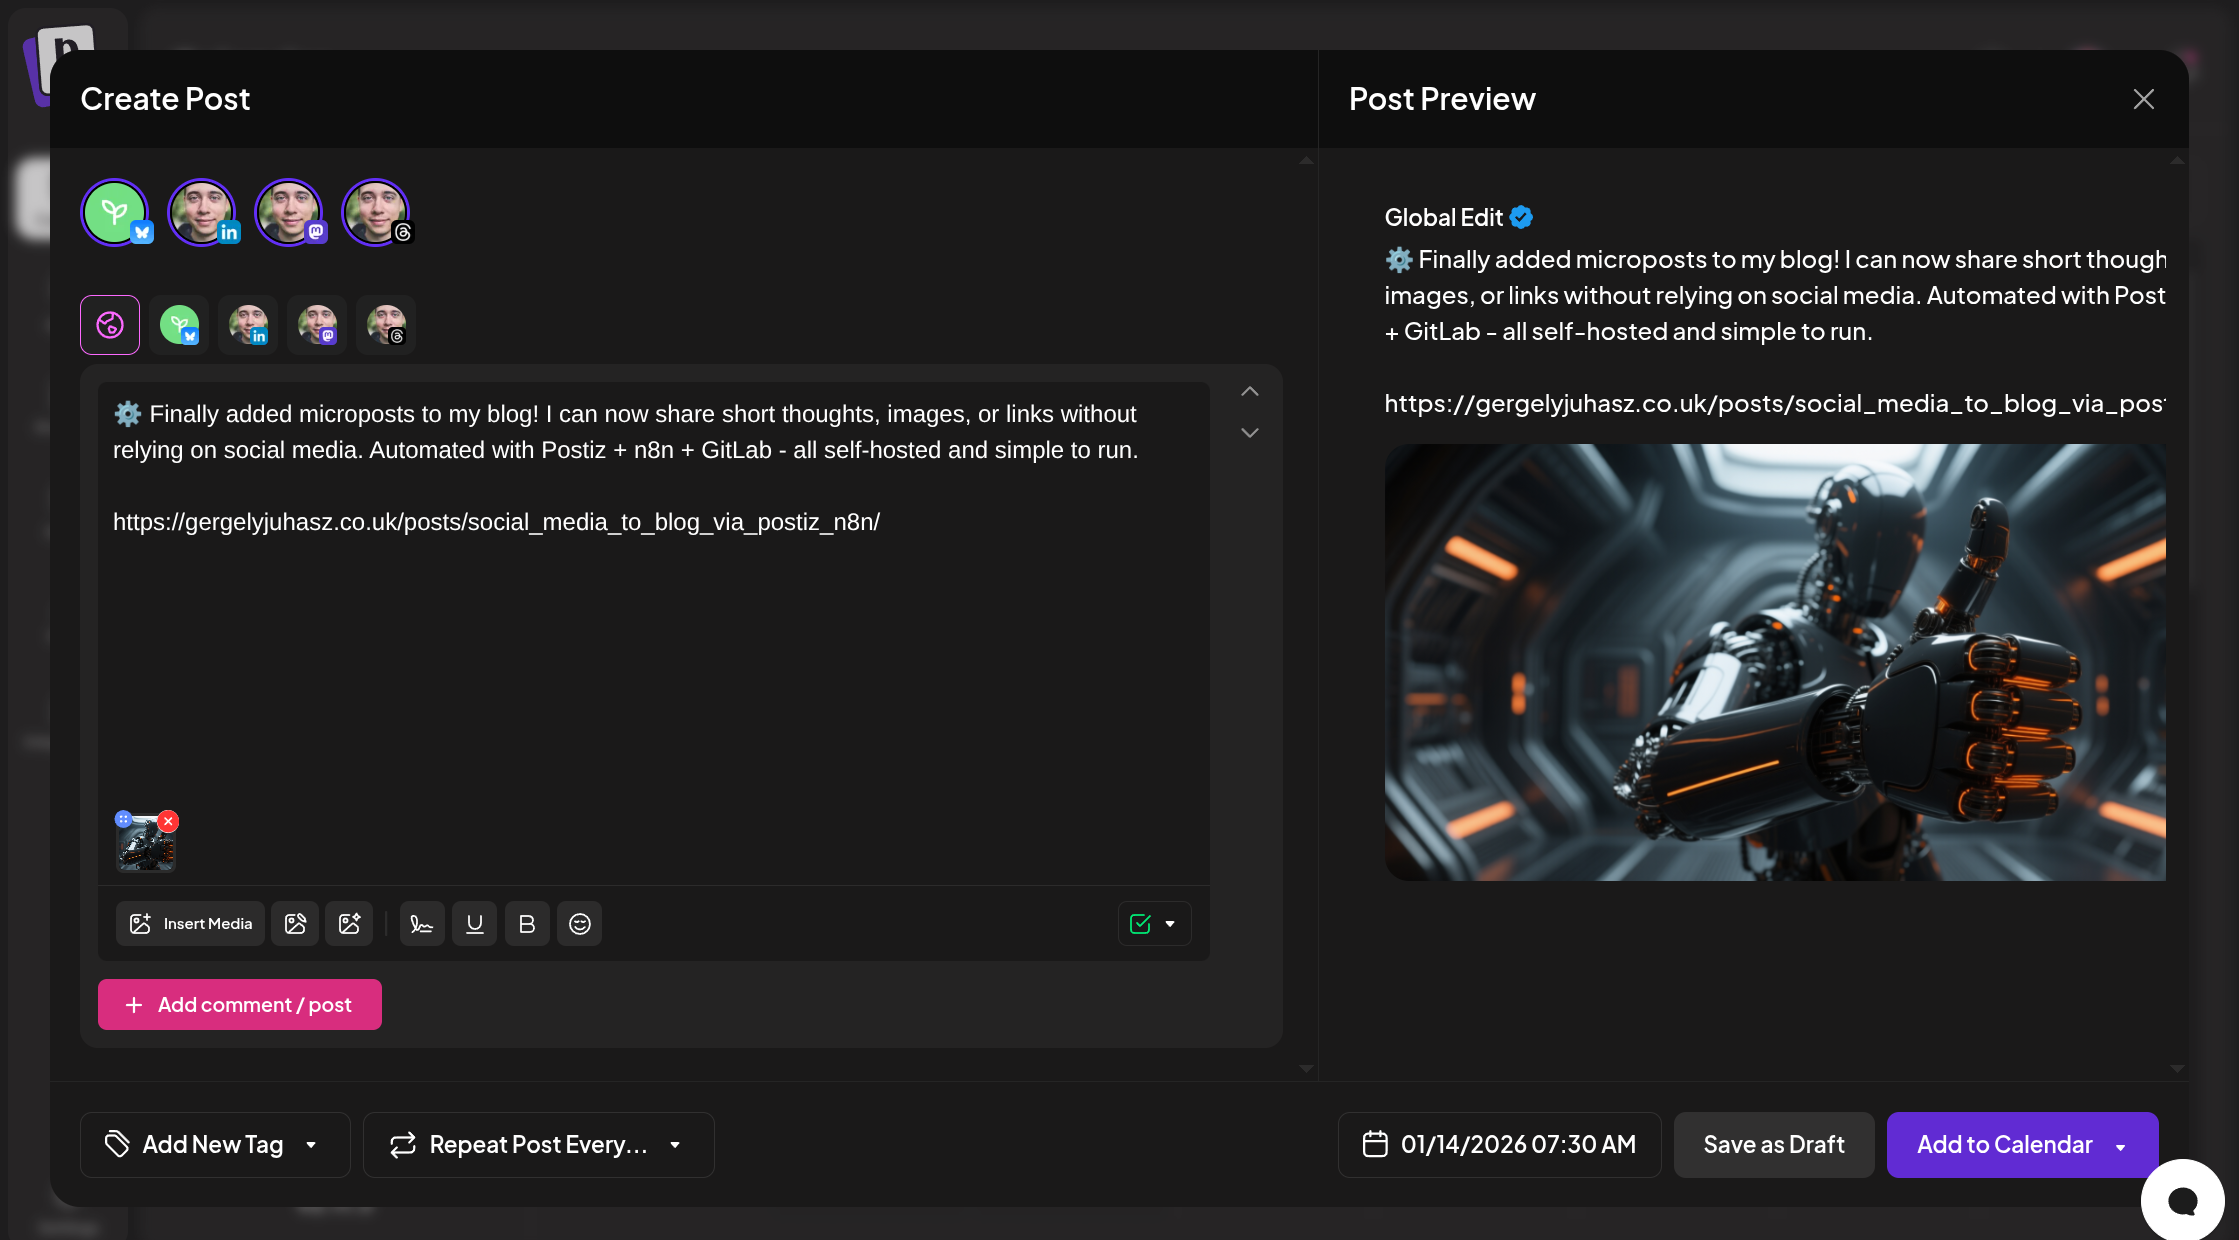
Scheduling new posts in Postiz is straightforward:
- Click the Create Post button on the Calendar page
- Pick a date and time using the date picker
- Select which channels (platforms) the post should go to
- Add your content (text, images, videos)
- Click Add to Calendar - or post immediately if you prefer
Each platform has its own character limits, which Postiz lets you handle individually:
- Bluesky: 300 characters
- LinkedIn: 3000 characters
- Mastodon: 500 characters
- Threads: 500 characters
For now, I’m keeping most posts under 300 characters so they stay consistent across platforms. Postiz also lets you customise the text for each platform if needed.
n8n workflow #
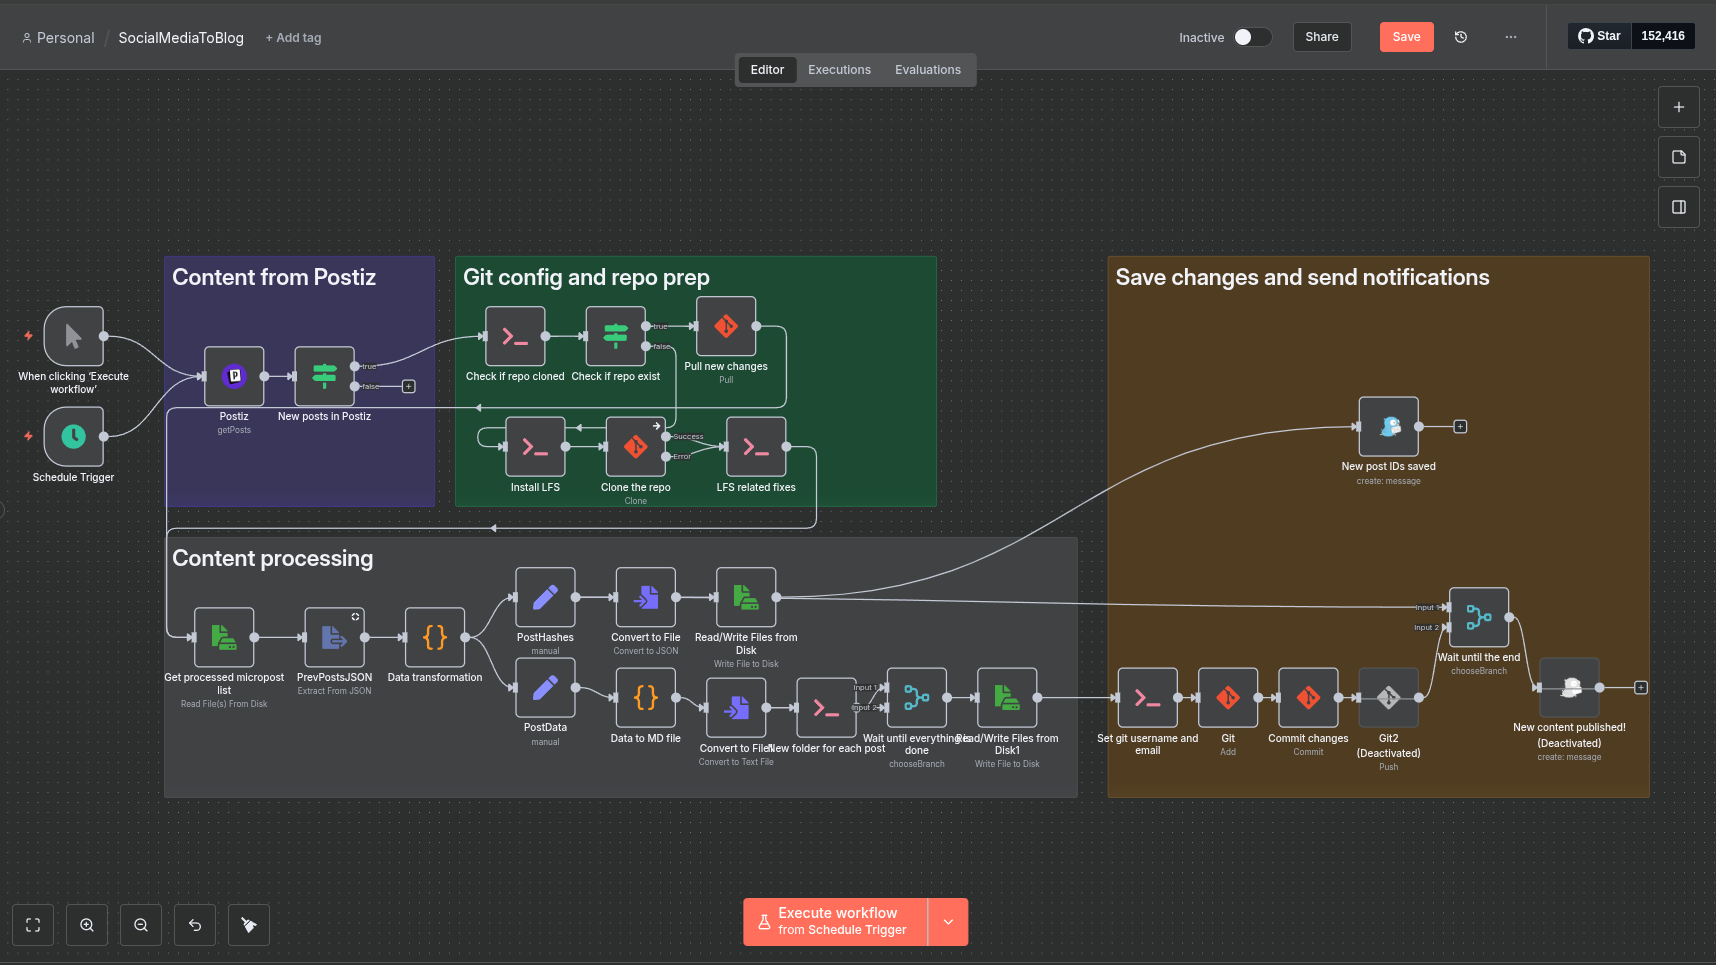
This is where most of the heavy lifting happens: n8n. I won’t turn this into a full n8n tutorial - there are already plenty of great ones online - but I’ll give an overview of how my workflow is structured.
The small boxes with grey borders and icons in the middle are nodes, each representing a single step. Some nodes fetch data from Postiz, others interact with GitLab or run small scripts. You can also write custom logic using JavaScript or Python if needed. The lines between nodes control the order of execution and the data that gets passed along.
The coloured backgrounds and titles are just like sticky notes - they help me keep the workflow organised visually, but don’t affect how it runs.
Triggering the workflow #
I have two ways to start the workflow:
- Manual trigger - handy for testing; you just click the big orange button
- Scheduled trigger - runs every 5 minutes to keep everything in sync automatically
Pulling content from Postiz #
Postiz has a web API, and there’s a dedicated n8n node for it. Setting it up was straightforward:
- Add my Postiz credentials to n8n
- Import the Postiz node
- Select the API endpoint I want to call
- Set the start and end time dynamically (for the end time, I use
{{ $now.toUTC().toISO({ suppressMilliseconds: false, includeOffset: false }) }})
This way, the workflow only processes new posts. If there’s nothing new, it stops; otherwise, it continues to the GitLab steps.
A couple of quirks I ran into with the Postiz API:
- The list posts endpoint doesn’t return multimedia attachments. That means images or videos can’t automatically be included in the microposts. I could access the database directly, but it’s not worth it - I can add multimedia content to my blog manually.
- Posts targeting multiple platforms each get a unique ID. Because the text might differ slightly per platform, I generate a unique hash from the first 100 characters of the post to track which ones have already been processed. This works, but I need to keep it in mind when writing content.
Git setup and repo prep #
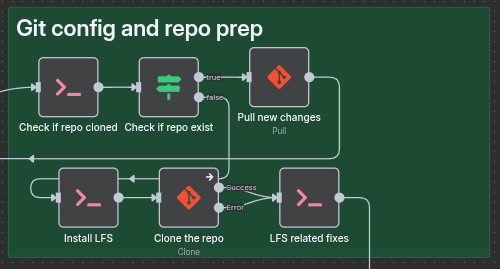
n8n runs inside Docker, so Git commands execute inside the container. As data inside containers are not persistent, this means the workflow has to check whether the repo already exists in the container:
- If it exists, it just pulls the latest changes
- If it doesn’t exist, it installs Git LFS first (to handle binary files like images and videos), clones the repo, and applies a few LFS-specific configurations
One limitation of the free version of n8n: SSH authentication for Git isn’t supported, so I had to use an access token instead. Not a big deal, but worth mentioning.
Processing content #
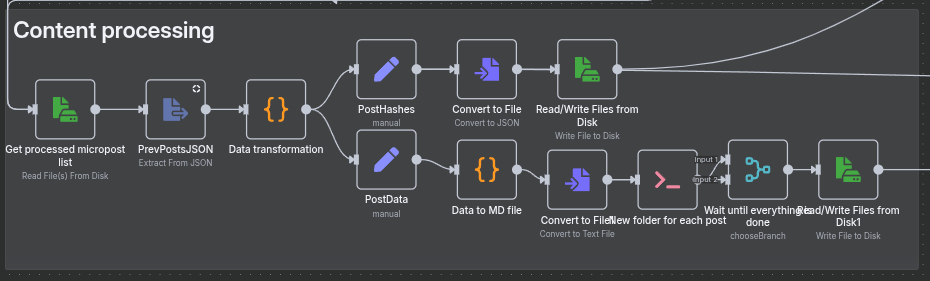
For most of this work I was able to use built-in nodes. The only parts where I had to write some custom code contain very specific logic for the problem I’m trying to resolve.
Once all data is ready, the workflow transforms it into Markdown files for the blog:
- Read the list of previously published post IDs
- Filter out posts that have already been processed
- Build a hashmap/dictionary with the post content, publishing date, and social media links
From there, the workflow splits into two paths:
-
Saving processed IDs
- Extract unique IDs
- Convert them to JSON
- Write them to disk
-
Creating Markdown files
- Transform each post into Markdown with YAML front matter
- Generate folders for each post
- Write the files to disk
Here’s an example to give you an idea how they look like under the hood:
---
title: "2025-04-18T08:00:00.000Z"
date: 2025-04-18T08:00:00.000Z
draft: false
social:
    - linkedin: "https://www.linkedin.com/posts/activity-7322515023250046978-WQAe"
    - mastodon: https://mastodon.social/statuses/115289899882649620
    - bluesky: https://bsky.app/profile/did:plc:nb4r4upwh5mm5vx3wwxtdclc/post/3lzz22mjaxl2p
    - threads: https://www.threads.com/@gergelyjuhasz.co.uk/post/DPOcJ-Qjb6J
---
<p>After years of wanting to start a blog, I've finally done it! I've also upgraded my PC which will allow me to play around with local LLMs, a topic I'll explore in upcoming posts.</p><p></p><p>For now, here's my initial setup:</p><p>https://gergelyjuhasz.co.uk/posts/baseline-2025/</p>
Finally, the workflow commits the new files to GitLab and pushes the changes. Gotify sends me a notification once all of this is done, so I know the workflow completed successfully.
Gotify #
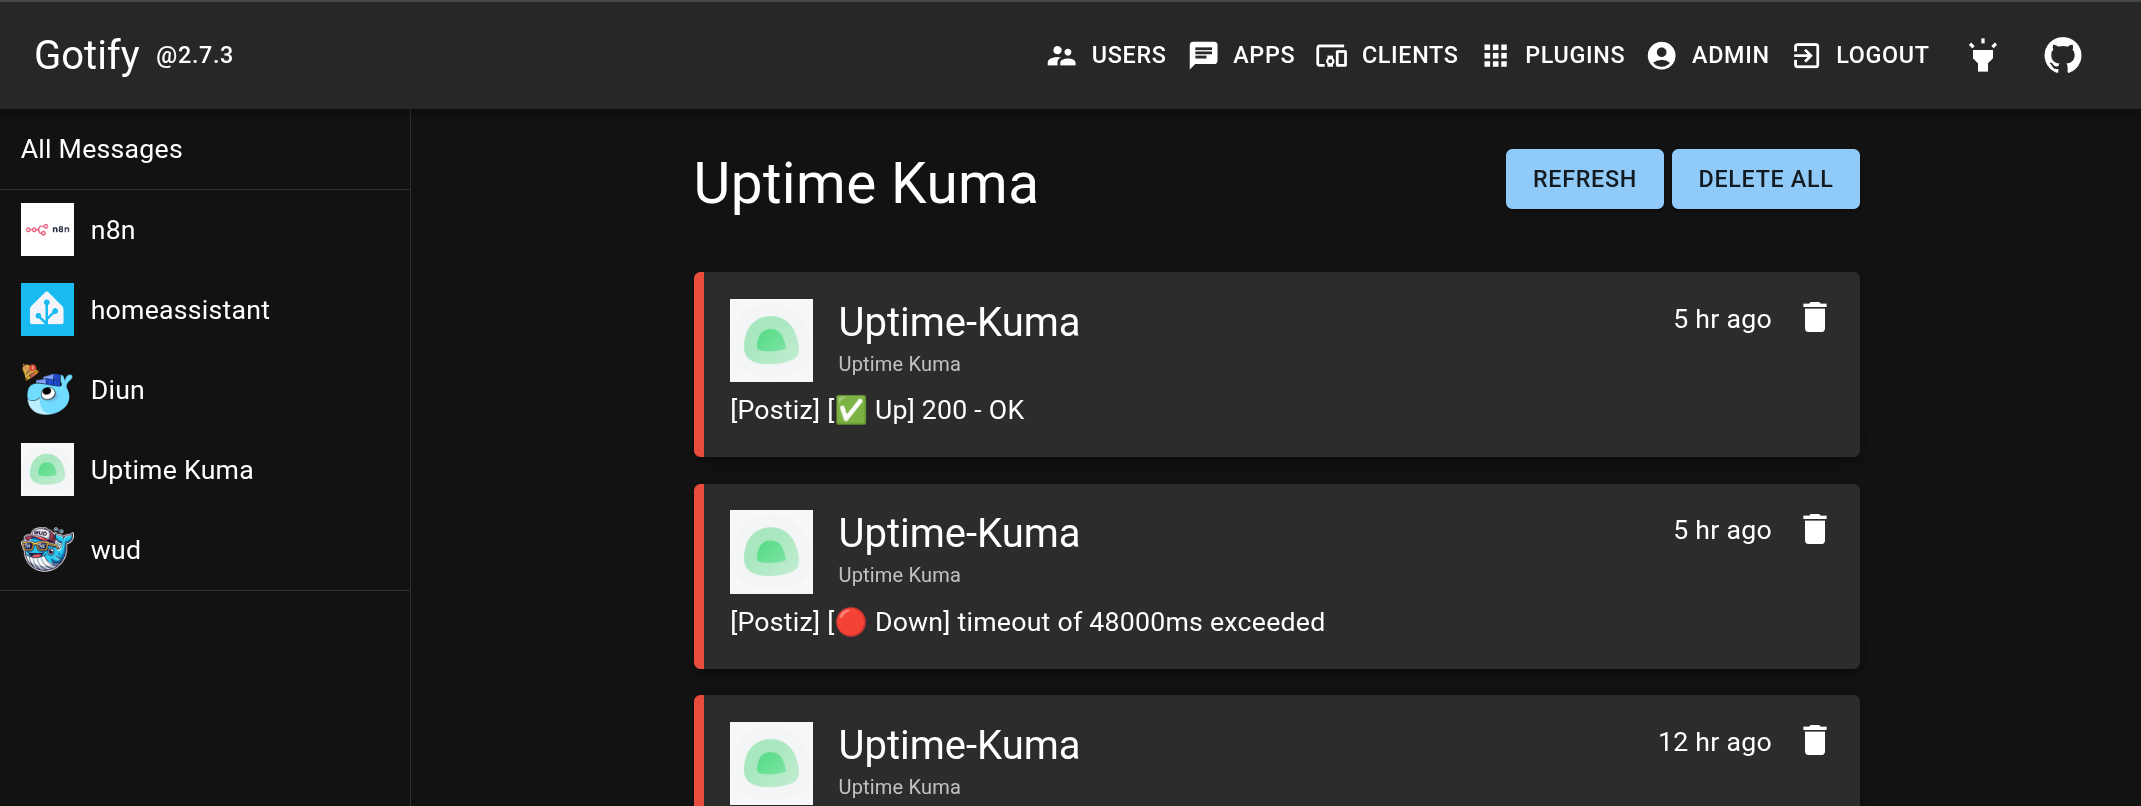
Gotify is what keeps me in the loop. It’s a self-hosted tool for sending and receiving messages, including push notifications on your phone. While there are plenty of commercial alternatives, my goal is to keep all the data at home whenever possible.
In my workflow, Gotify is the last step in n8n. Once all new posts have been processed and committed to GitLab, Gotify sends me a notification so I know everything ran smoothly. It’s a small thing, but it gives me peace of mind - I don’t have to check the workflow manually every time.
Many of the other tools I use integrate with Gotify out of the box, which makes setup super easy. It’s definitely one of my favourite self-hosted tools!
Conclusion #
Overall, I’m really happy with this new micropost feature. Hopefully it’ll help me post more regularly without the pressure of writing a full-length blog post every time.
Did n8n change my mind about low-code / no-code tools? Not really. It’s great if you can’t host your own code easily or aren’t a software engineer - in those cases, it’s a powerful way to automate workflows. But for me, with a home setup that can run whatever I like and years of coding experience, I still prefer writing my own scripts.
That said, n8n is great and flexible. It gave me a way to experiment, and even if I won’t use it for everything, it might still be a useful tool for automating tasks for other projects or for someone who isn’t comfortable coding.
All in all, this project was fun to build, it solved a real problem for my blog, and it gave me a chance to explore a new tool. Now the only question left is whether these microposts will actually get me to post more often - we will see.